William Thorup

Illustrator, Motion Graphics Designer, Animator, and VFX Artist

Category: Uncategorized

  • Atari ST | SatanDisk Partition Loss Fix/Modification

    Atari ST | SatanDisk Partition Loss Fix/Modification

    So I have had my SatanDisk for about a year now, and it has been an absolute joy to use. Transfering files to and from my Atari ST to a modern computer is a snap. It allows me to work on my pixel art easily (I need to post some of this some day…), and allows me to back up my programming work easily as well. If you are still and avid Atari ST owner, I highly suggest at least getting this. There are some better options out there now (like UltraSaTan and CosmosEX), but this one is so simple to use, and relatively cheap to get.

    With all that it has going for it though, there is one thorn I haven’t been able to pull out since the day I bought it. Seemingly random partition table loss on the SD card, making data hard to restore without using a hex editor. Sometimes the partition table becomes corrupted when I power everything down, or forget to power off the SatanDisk before pulling the SD card. All I know for sure is that it is happening, and I am not the only one who has had an issue with it.

    When I set out to see if others were having a similar issue as I was, information was sparse. Most people were complaining about a flaky DMA chip (way over my head kind of stuff), but all these users were dealing with STe and Mega ST’s, I am still using my lowly 520ST. Then when poking around Jookie’s site (the creator of the SatanDisk, there was a listing in the Download section about someone else having the same problem as me, and on the 520ST.

    After examining the two pictures included in the fixes ZIP file, I soon realized that the SatanDisk I had bought from this seller on Ebay (seller: darekp324 ) was using a different PCB layout than the original schematics. This is the main reason why I am doing this post, to help those who may have bought the same model of SatanDisk I did. This mod keeps the SatanDisk from ruining the partition table on the SD Card. Lets get started.


    Tools and Supplies

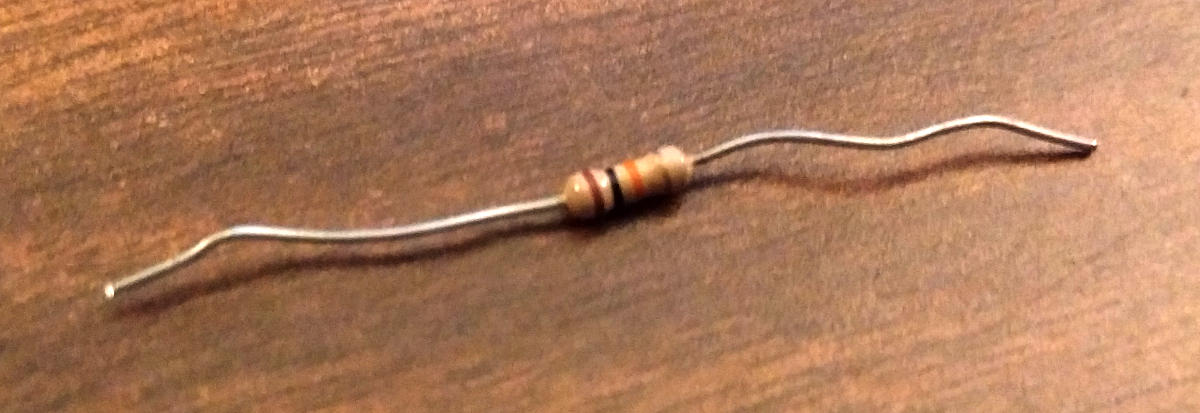
    You will need your trusty soldering iron and some solder. A pare of wire snips, and a 10K ohm resistor (colors: brown, black, orange, gold). A small flat head screw driver and a hammer.

    resistor_10kohm

    10K ohm Resistor

    Opening the Case

    The maker of this particular SatanDisk decided that a permanently sealed 3D printed case was the solution to encasing this wonderful device unfortunately. And if you are worried about damaging it a little bit, then this isn’t the tutorial for you. We will need to take the top and bottom layers of the case off.

    Put the case on it’s side and using the the flat head screw driver, find a point to split the case open about 1/2 cm from the top of the case. A couple taps of the hammer on the screw driver should begin to drive the layers apart. Now just work your way around the edges, separating the top from the rest of the case. Do this for the bottom of the case as well.

    Soldering Points

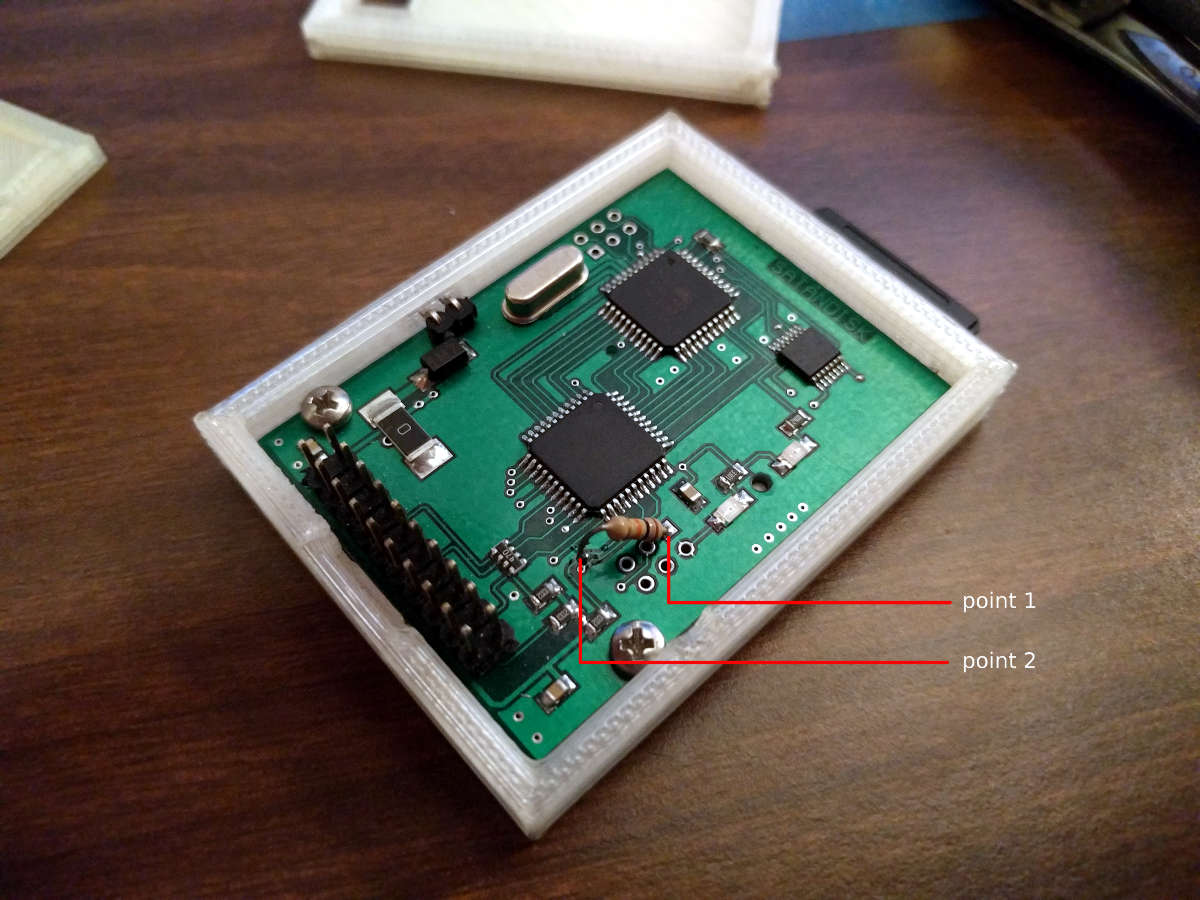
    This is where you will save a bit of time, about 10 minutes, because I was able to determine where to attach the resistor after following a few traces. Here is a picture. Solder at the points marked. Point 1 is a through-hole, and you will be soldering on the back, while point 2 is on the top surface of the PCB and will require very little solder to attach your resistor to it.

    satandisk_diagram

    Click to Enlarge

    After soldering your resistor, you will be done. I just used some tape to put the case back together, or move it to a different case, and you are good to go.


    Fairly easy, and I hope it saved you a bit of time. I have tested it somewhat thoroughly. Pulling out the SD card while everything is powered on, power cycling the SatanDisk, etc… and the partition table lived through it all. Please let me know if it didn’t work for you, so I can reassess where the resistor needs to be soldered. Time to go play some Rodland.

  • Ehh…

    Ehh…

    Yes, It has been a while since I have posted anything.  Been doing some on and off work for Overstock.com, and sometimes it requires me to stay really late to get a job done.  The late hours sometimes sap my motivation to do anything the following day.  Not the greatest excuse in the world, but it is what it is.

    With that said, I will have some time for the next few days to work on some personal projects.  So I should have some concept art for a short story that I am writing.  Stay tuned!
  • Romulan Ale!!

    Romulan Ale!!

    Didn’t have allot of work today, so I took the time to jump into the new Blender cycles engine.  This tutorial is what I had mimicked to get this wallpaper you see below.

    This took me a good part of an afternoon to finish up.  The hardest part was getting the federation logo right.  (Lets just say this is something that is ridiculously easy to do with the old render engine, and the cycles engine still has a long way to go in the texturing department.  Plus not a whole lot of documentation on the render engine yet).  But I am looking forward to getting more acquainted with it in the future.  I also used Gimp, for some touch up work, and I used Inkscape for the text.

    Anyways, here’s to you Kirk!

    And everyone else, enjoy!

  • Small Update

    Small Update

    Just a little update.  Its been a while since I have posted.

    Been really busy with work.  This is the excuse for the lack of updating.  But I am working on a few pieces right now, and should have some more stuff posted within the next week.

    And by the way, thanks for stopping by and checking in.  If you have any comments for my art, please leave them.

  • Some Sketches

    Some Sketches

    I haven’t posted anything for a while, so I thought a couple sketches would do to hold me over until my next post.

  • Character Animation

    Character Animation

    I wanted to start building a character that I have been drawing for a while, over the weekend. I modeled it and then today I got a quick rig together with the riggify add-on for Blender and had some time to put together a really quick animation. I’ll texture it later perhaps.
    Here it is! Enjoy!

  • Fun with Particles

    Fun with Particles

    During some down time with Thor Media LLC. I had the chance to study up on one of the many aspects of 3D that I haven’t gotten my hands in much at all, which is particles.

    I saw a Linkin Park video that has some cool crashes of debris flying around and decided to learn how to do that in Blender.

    And here is what I came up with

    I am thinking about doing a tutorial for it eventually.  It is pretty simple to setup and I am trying to figure out a way to automate it a little more so you can do as many explosions as you want at any given time without much effort.

  • My Paint is Fun

    My Paint is Fun

    One of my brothers had been following project Sintel over at Blender.org, and he noticed that they were using some other software for some of the conceptual art for the project. One of the pieces of software that they were using, other than Gimp, was another open source software called My Paint.
    Gimp in many ways is much like Adobe Photoshop, and like it, it is unable to simulate some of the effects that you get with real medium. (There are professional pieces of software that can simulate real artistic medium. Like Corel Painter). That is what My Paint is for.

    I have just taken a few moments to play around with it, with my tablet, and have found that the watercolor tools are quite fun. You are able to manipulate the way the brush lays down the color and effect what is already on your canvas. Which, in turn, simulates some of the effects of real art medium. And there are still a ton of other options and little tweaks you can make that I do not understand yet.
    I know that some professional digital artists do use programs like Corel Painter to produce some of their artwork, and I know that I will eventually have to dive into that kind of software to broaden my horizons. And it seems that My paint is a program that is very capable in doing that.

    If you would like to grab your free copy of this piece of software go ahead and download it at http://mypaint.intilinux.com/ and give it a spin. Also it took a little while for me to get used to the interface. So here is the link for the producers run down of keyboard shortcuts and other things that would help when you start using My Paint.
    Have fun!

  • Mission portrait

    Mission portrait

    This actually is not a portrait of anyone on my mission. Just a quick sketch I did when I had the time.
    I am starting to get back into the feel of using a drawing tablet for digital art, as I was only able to use traditional medium at the time. (Which, at times, was restricted to a few pens and a highlighter).
    This one is not quite finished yet, and I am not too sure if I ever want to finish it.

    But a few things that I have learned from doing this. And a few things that I discovered after forgetting them after two years. One of these things, is laying out a color pallet before you get started painting. This has helped me understand the kind of lighting I have and also keeps me from making the painting too busy with a variety of colors. In order to get correct skin tones and tones of other materials, you do need a wide range of color. But, in most cases, most of the work can be don’t with a limited pallet, and then, when finishing up a painting, additional colors can be added.
    One other things that I relearned, was the wonderful uses of the airbrush tool. As I was painting this, I relied heavily on the brush tool. Although most of the light/dark transitions can be achieved using this tool, I was strugling with smoothing out some rather sharp transistions. This is where the airbrush comes in. After laying down your colors for your lights and your darks, and after creating the basic transistion from your lights to your darks, the airbrush tool can be used to smooth the transistion in the places needed. Just use the color picker tool to select an already existing color within the transition you wish to smooth out, and begin smoothing the transition. I find using the color picker tool to constantly change to a different tone within the transition, will create a good transition with out reducing the amount of color in your work. If you don’t have a tablet dropping the opacity of the tool to 20% or so should do the trick. If you have a tablet just make sure that the opacity is turned on for the pressure sensitivity, and see those hard transitions go smooth.

  • I am back!

    I am back!

    That went quick…
    2 years flew by and I have finished my mission in the Taiwan Taipei mission. It was really good. It was really great to have the opportunity to learn Mandarin, and to help people come to Christ and change their lives.
    I rolled in here about Nov 24th 1:00am. My plane was delayed for 6 hours and we had to head back to Vegas because of the big storm that his Salt Lake at the time. But it was really good to go down the escalator, in the airport, and see my family again.
    The adjustment has been interesting. It is kinda weird being surrounded by white people all of the time and I am still trying to speak English 100% of the time. These adjustments will come in time.
    Today I was able to see alot of old friends and say hi. I hope to catch up on some movies and get some rest to get my leg recovered.
    Looking forward to it.