William Thorup

Illustrator, Motion Graphics Designer, Animator, and VFX Artist

Category: Illustration

  • Self Portrait | 16-bit

    Self Portrait | 16-bit

    Personal Portrait_scaledX2_web

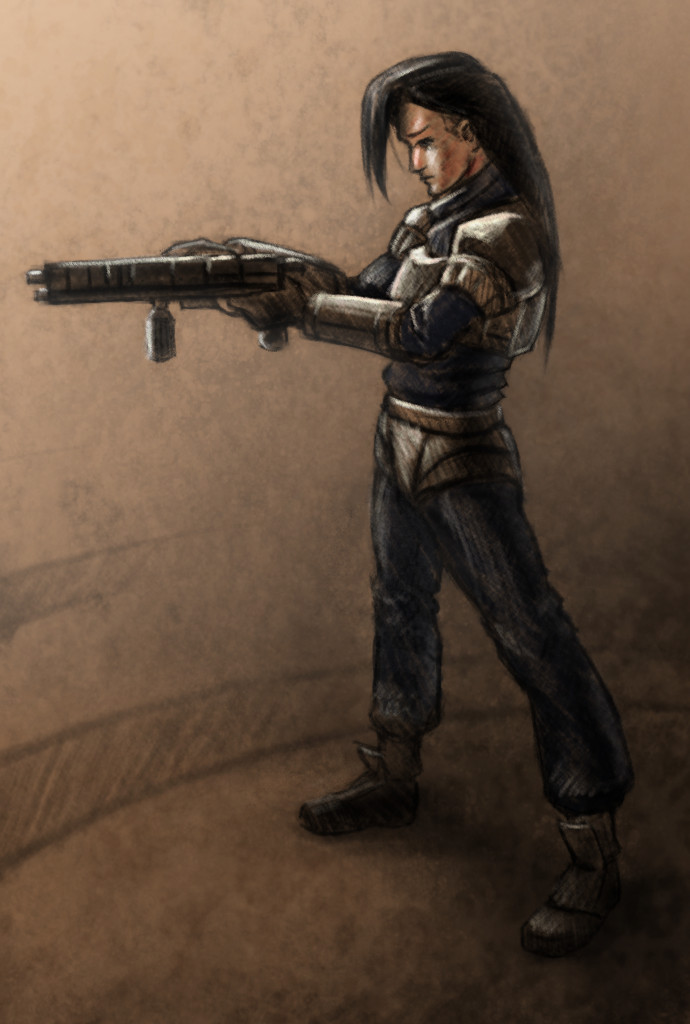
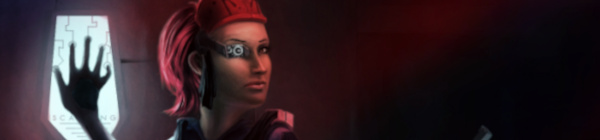
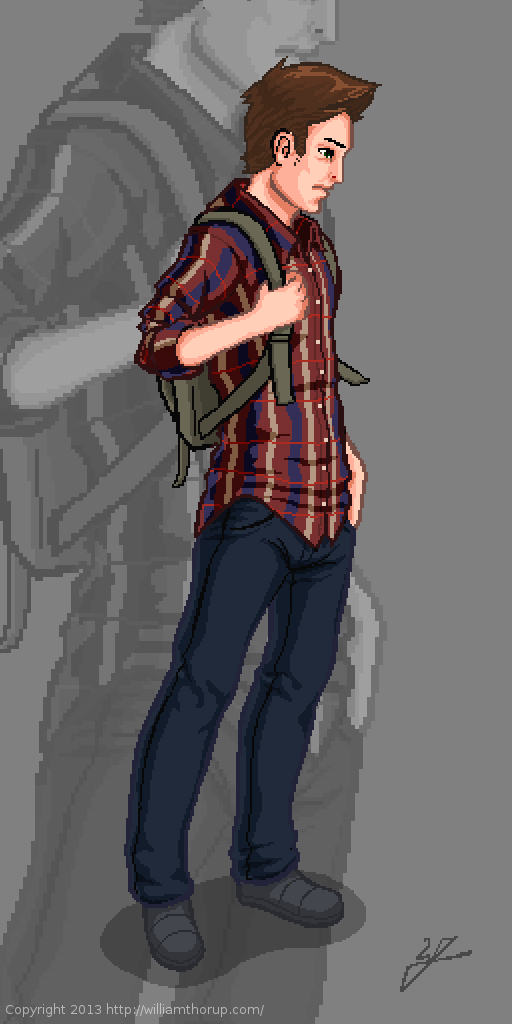
    Got thinking about the Atari Jaguar again, 8/16-bit stuff, and nostalgia hit. So, to help feed the hunger for the good-old-days, I thought I would do a some 16-bit graphics myself.

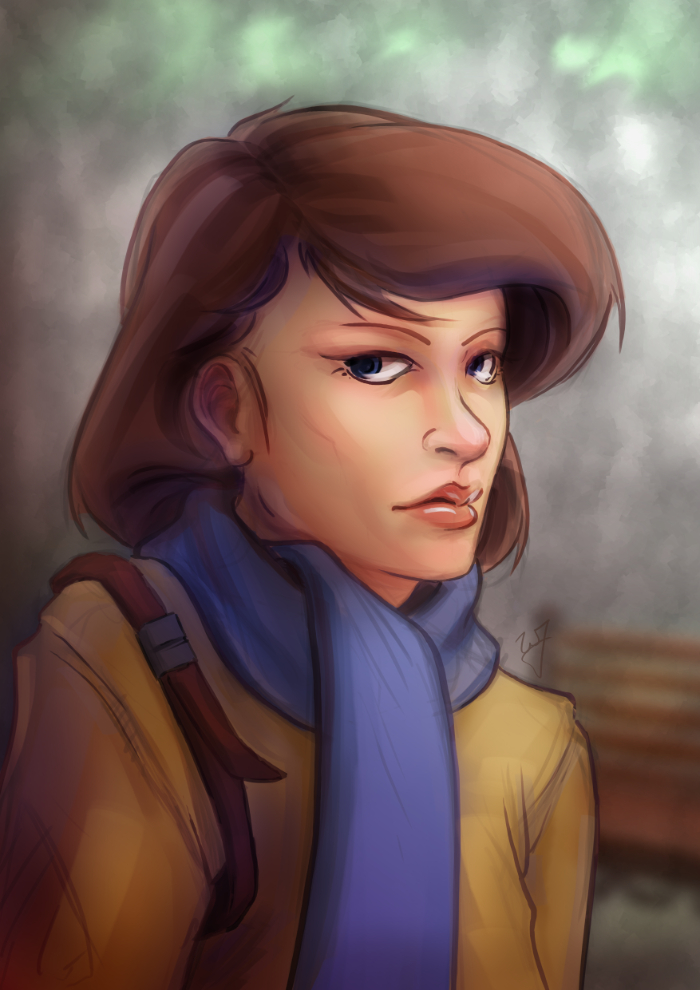
    I didn’t want to come up with a character concept, or anything, so a self portrait seemed like a good choice. As for style, I was thinking of King of Fighters, or Samurai Showdown. Great fighting games, in the same realm as Street Fighter. Sticking closer to the cel shaded style over the smoother more realistic styles that come from some of those games.


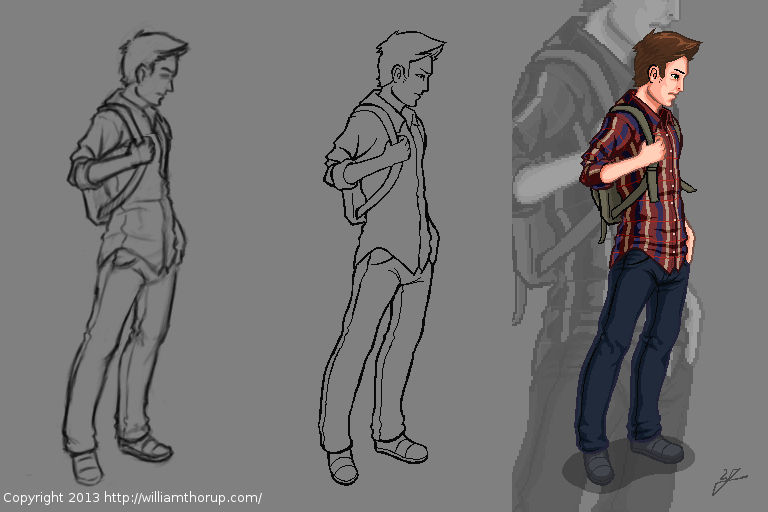
    Doing 16-bit art changes the way I think about things. I started out with a sketch, just like any other piece, but when I began moving into the line art, things began to change. Similar to paying attention to the shapes of your lines when inking, when doing low-resolution outlining you have to pay special attention to your lines. The limited resolution forces you to figure out how to make lines go from thick, thin, then to nothing.

    Also, another problem that is introduced lines that curve, don’t curve very well. Because pixels are generally square, it gets harder and harder the smaller resolution you have to make a decent circle or curve.

    But there are pros as well. With the limited resolution, there is less detail to worry about. This is one of the reasons why games have gotten shorter over the years. The more resolution you have, the more detail you need to fill that empty space, and the more the costs go up to fill that space. Therefore a shorter game. But, my point is, less detail to worry about.

    Personal Portrait_process


    This piece was originally done at 256 x 512 pixels, with a palette of about 30 colors. I did it at that resolution to test out larger graphics on the Jaguar for the future. My brother and I have been playing around with coding our own Jaguar stuff, and would like to move into a game eventually.

    But that is way in the future, and I consider this more about practice than actually putting together a game. I have enjoyed doing this small piece. Simple, stylized, and looking forward to doing more in the future. And I wish my hair actually looked like that sometimes.

  • Krita 2.6 Illustration | In the Park

    Krita 2.6 Illustration | In the Park

    Jumped back on to the Krita bandwagon the other day, and it was good. It’s fun to be in a new program and learn new keyboard shortcuts and tools. And I love the rotate canvas feature, I sure hope Gimp eventually gets that feature because it invaluable when editing, not just drawing or painting.

    In the Park


    This piece was really enjoyable. There were some points of doubt and uncertainty, especially when I started coloring, but overall I like the final result. I wanted to do something a bit more cartoon oriented, but keeping my focus on color and composition.

    One thing in particular I kept in the forefront of my mind was the rule of thirds. Not in with the painting as a whole, but with the subject instead. Focusing on the silhouette of the character, you will see that the left and right sides of the subject have 3 major hills or bumps. This, along with the backwards “S” curve in the hair, was used to create symmetry at the focal point (the face) and a softer look towards the face.

    Look at this in contrast with the subjects jacket. Her shoulders, and other lines on the jacket, are sharper. Which makes most viewers follow the blue scarf (a softer shape) up to the face.


    As a side note. If you haven’t had the time to check out my latest tutorial, Using Gradients, I highly suggest it. Good reading. I use this painting in most of the examples, and show how I added depth, color diversity, and a focal point, by using two simple gradients.

  • Article | The Music of Final Fantasy

    Article | The Music of Final Fantasy

    Intro main image

    Click HERE to start reading an article I put together as tribute to some of the great music in Final Fantasy.

    This article was written for a contest at 1up.com, HERE.  Check it out, there are some other really good posts there, definitely worth reading.  It’s great to see how many people this music inspires.

    When I started writting the article, I knew I would want to do a few illustrations for it as well.  Seeing that this blog and portfolio was created to represent my art.  Here are a few things that I learned during this process.

    I should have set some better goals.  I though about the music allot, and what I wanted to talk about, but I sacrificed not setting goals with the illustrations.  When I was done with my first draft, I tried to go through the article and think of what scenes or characters would best represent that part of the article.  The problem with this thinking was, I had no idea how many illustrations I wanted to do.  In turn, I had no idea how long it would take to get them finished, and what style I should do them in.

    So I rushed the last couple days, finding out that I do better work when I am rushed, at least.  And I ended up settling on two different styles for the illustrations.  A vector monochromatic and full color pencil mediums.  I won’t post the vector illustrations here, but you can see them on page one, by clicking HERE. Overall I though that they came out good, and do contribute to the article overall.

    These three color pencil pieces were done in Gimp,  I was surprised at how close I could get it to look like the real medium.  I looks like color pencil but enhanced by the pure colors brought by digital.

    Overall, the experience was good, and I am planning on doing some other project articles with illustrations in the future.  Anyone here like Myst?

    Again, enjoy the article, and let me know what you think.

  • Petra Draco | Illustrated Wallpaper

    Petra Draco | Illustrated Wallpaper

    Dragon Wing_web

    The holidays hit and time was placed elsewhere for  about a week.  My brother and I have kept busy with “Josh the Whale”, and are making good progress on that front.  We are looking at a release date around January 15th.  Been having fun modeling, texturing, and animating whales, but I am looking forward to finishing it, and moving on to another project.

    Speaking of which.  We are working with a talented story teller, Ryan Thatcher, and getting a RPG/Action Adventure game together.  We have developed some good ideas for story, and for game play mechanics, and are very excited to get more involved in that project.

    But in my free time, I have been looking at other planned projects, both personal and work related, in search of some room to develop concepts or just produce some art for those ideas.  That is where this illustration came from.  This a project that Thor Media has put on stand still for the moment, but still in the concept stage.  I can’t talk too much about the project, since allot of the details aren’t concrete yet, but sharing a little of that development, visually, can’t hurt.  Sorry, no video this time around, but If you haven’t taken the time to see some of my other time lapse videos, I encourage you to watch and comment on my YouTube Channel.

  • Sea Fire | Personal Illustration

    Sea Fire | Personal Illustration

    Another illustration. Inspired by all of the underwater stuff that I have been doing lately. Plus, I have been thinking of these colors quite a bit lately, since it is similar to the color scheme of my website.

    For anyone that might be interested in what I use to record my desktop, and how I go about editing. I use a simple bash script with ffmpeg to record. Nothing too fancy. The script records at 24 frames a second into an h.264 codec, keeping the file size small. But whats special about this script is that it records for 7 minutes, saves that file, and then starts recording again to a different file. It names the files acording to the date and time they were created. Here is the script.

    while :

    do

    ffmpeg -f x11grab -r 12 -s 1920x1080 -i :0.0 -vcodec libx264 -vpre lossless_slower -threads 2 -vframes 5000 /media/Wills\ External\ Hardrive/Desktop\ Recording/output_`date +'%Y%m%d_%H%M%S'`.avi

    sleep .25

    done

    The problem with recording to video is that if you are recording for an hour or two, and ffmpeg crashes, you lose that entire recording. And there usually isn’t anyway to recover that data. This is a problem I ran into several times, and it ruined a few paintings because I would just get frustrated from losing all that recorded work.  Making a consistent time lapse video impossible.

    But, if you record in shorter segments, for example 7 minutes, then you can never lose more than 7 minutes of work. This takes my mind off of worrying about my recording so I can just focus on painting.

    Right now the script is setup for Linux, but I believe it can be easily adapted for Windows.

  • New Website | The Creator’s Cave

    New Website | The Creator’s Cave

    The new site is officially functional, for the most part, and I have another piece to post.

    I was watching a tutorial video by Feng Zhu School of Design, Here, and I was inspired to get a feel for how I handle the chaos to control thing.  I really like these tutorials.  He trie to make them as short as he can, without making it ambiguos, and stick to key ideas in his process.  He also points out things to focus on during a similar process, and he repeats those points.  He’s a good teacher, and I have enjoyed allot of his tutorials, both on YouTube and idrawgirls.com .

    We have been waiting for this children’s book application job to come through, so I thought that, before things get busy, I should move my website to my domain and to a WordPress format.  I like WordPress, because there is allot more you can do with it when it comes to coding and plugins.  Blogspot is nice, but visually and functionally, it feels a bit dated.  Plus, I like to be able to ftp right into my site to modify things.

    So, if you haven’t already, you will need to change your book mark, or make note of the different address.  http://williamthorup.com/  .  Right now I am still migrating images from the blogspot blog to this one, so I can’t shut the old blog down yet.  But if you still use williamthorup.blogspot.com or www.williamthorup.com, you will automatically be redirected to this site.

    Please check out the portfolio.  It is much more interactive than my previous one, and easier to look at specific categories.

  • Pira Tess, Space Brigand | CGHUB CharacterFORGE 2D Entry

    Pira Tess, Space Brigand | CGHUB CharacterFORGE 2D Entry

    Another CGHUB competition piece, done in the Gimp.  You can check the finals thread here.  Everyone’s pieces should be posted by the end of the day tomorrow.

    I don’t think I will get many votes, simply because of the amount of other great artists on the thread this time around.  But it is good to see the different techniques and styles involved.  I can obviously see where I need to improve.  Its a humbling experience every time I enter one of these kind of things.


    In that respect, it seems that every painting I do, I see allot of personal progress.   Getting my nose into those books, practicing the techniques presented, and analyzing great artists, has been a huge boost to my learning process.  And I am loving every second of it.


    Sorry for the jumping around towards the middle of the video.  When you are getting into details, it is hard to avoid.  But I did go through over 10 hours of footage to improve it the best I could.


    One other thing I would like to mention is one of the artists in particular, mdonze.  This artist made an interesting post about his painting here.  Beside the painting being amazing, in my opinion, he used a process similar to the way a 3D application would render and image out.  I have heard about this process before, but this is the first time that I have actually seen it used for a 2D piece.  And somewhat explained.


    This is something that I am planning on practicing in the future.  I do have an idea of how a computer pushes a 3D scene through passes (specular, ambient occlusion, color, alpha, etc…).  And I think a technique like this will help me use both my 3D experience with my illustration to improve my skill set.

  • Rope the Beast | Gimp Paint Studio 2.0

    Rope the Beast | Gimp Paint Studio 2.0

    This painting was done in Gimp Paint Studio 2.0 (GPS), and took approximately 3 hours to complete.

    This calls for celebration! Mr. Ramón Miranda was so kind to port Gimp Paint Studio (GPS) over to Gimp 2.8.

    For those of you who aren’t in the know on this. This is a wonderful set of brushes, color pallets and a slew of other stuff, geared for artists that use the Gimp. I really enjoyed using Gimp Paint Studio with Gimp 2.6, but when the move was made to Gimp 2.8, some of the functionality for the predefined brushes were broken. rendering it useless for my work flow.

    But the sun does come up in the morning, and this wonderful man has done a great favor for us all. And I dedicate this painting to him.

    ____________________________________________________________________________________________________

    For those of you who are interested in installing it, it is really easy.

    First go to the download page HERE

    And download these files:

    • sessionrc para GPS 2.0
    • GPS_Extras _old
    • GPS_Gimp_Paint_Studio_2_0
    When you are finished downloading the files, unzip them and dump them all in the Gimp 2.8 folder.
    In Linux this is located in you “Home” folder under your username, and it is hidden.  So, you will need to be able to see your hidden files.  To do this completely depends on the file browser you are using.  I suggest doing a search to find out how to make hidden files view-able for your specific file manager.
    In windows, by default, it will be located at C:\Documents and Settings\\.gimp-2.8\  .  It is also, most likely, hidden, and you will have to enable ‘view hidden files and directories’ in your view options.
  • Pistol Whip

    Pistol Whip

    (Approx. 4 hours to completions).


  • Terishian – Competition Piece

    Terishian – Competition Piece

    Here is that competition piece I was talking about.  I encourage you to go and see all of the other, very impressive, submissions.  Lets just say, it was hard to post my stuff when going against artists with much more experience than I have.  But it is a good learning and humbling experience, and it helps me see where I need to improve.

    I also recorded my experience to share with you all.  Enjoy!